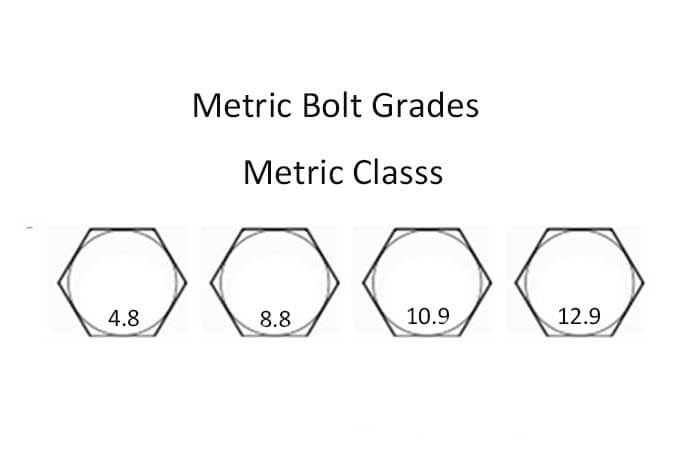
What are metric bolt grades indicated?
The metric bolt grades are designated by a symbol of 2 numbers, separated by a decimal.
The common metric bolt grades/classes are 4.8, 8.8, 10.9 and 12.9. The metric bolt grades have specific bolt strength grades. No matter the system used to grade the bolts, the higher the bolt grade number, the stronger the bolt.
How to identify metric bolt grades?
For example, an SAE grade 5 bolt will only have 3 radial lines on its head. A grade 8 bolt will have 6 radial lines on its head. Metric bolts are a bit more straightforward, usually with their strength class number stamped on the bolt head.
What are the different grades of metric bolts?
The standard fasteners have different specifications, and different metric bolts and nut strength grades will be divided according to the mechanical properties of the specific grade; what will the different metric bolt grades will be?
Metric bolt grades guide
- The strength grade of the metric bolt will be divided according to its mechanical properties, which can be divided into 10 grades. They are 3.6, 4.6, 4.8, 5.6, 5.8, 6.8, 8.8, 9.8, 10.9, and 12.9. If a grade level of 8.8 or higher has been reached, it is high intensity.
- The metric class 4.8, 5.8, and 6.8 are low-strength screws; they are not heat-treated, and the hardness machines generally can not be detected. Metric class 4.8 bolt hardness should be 130-210HB, about 10 RHC. General C1008 material and lower carbon content will be used to make metric class 4.8 bolts; C1018 – C1035 will be used to make metric class 5.8 bolts; C1035 and higher carbon content or alloy steel will be used to make metric class bolts.
- Its main material is titanium or alloy steel, formed by heat treatment. The performance strength level of the screw will be made by a combination of numbers, including the tensile strength value, including the flexural strength ratio value.
- The metric bolts used in the factory have reached the 8.8 class or higher, requiring higher strength to ensure that the screws are not prone to loosening problems.
- Metric class 8.8 bolt corresponds to the hardness of 22-32 HRC; metric class 10.9 bolt corresponds to the hardness of 32-39 HRC; metric class 12.9 bolt corresponds to the hardness of 39-44 HRC.
Metric bolt head markings chart
| Metric Bolt Grades Head Markings Chart and Strength Chart | |||||
| Head Marking | Class and Material | Nominal Size Range (mm) | Mechanical Properties | ||
| Proof Load (MPa) | Min. Yield Strength (MPa) | Min. Tensile Strength (MPa) | |||
| 8.8 | Class 8.8 | All sizes below 16mm | 580 | 640 | 800 |
| Medium carbon steel, quenched and tempered | 16mm – 72mm | 600 | 660 | 830 | |
| 10.9 | Class 10.9 | 5mm – 100mm | 830 | 940 | 1040 |
| 12.9 | Alloy steel quenched and tempered | 1.6mm – 100mm | 970 | 1100 | 1220 |
| Usually Stamped A-2 or A-4 | A-2 & A-4 Stainless | All sizes thru 20mm | N/A | 210 Min. | 500 Min. |
| Steel alloy with chromium and nickel | 450 Typical | 700 Typical | |||
| Tensile Strength: The maximum load in tension (pulling apart) that a material can withstand before breaking or fracturing. | |||||
| Yield Strength: The maximum load at a material exhibits a specific permanent deformation. | |||||
| Proof Load: The product must withstand axial tensile load without evidence of any permanent set. | |||||
| 1MPa = 1N/mm2 = 145 pounds/inch2 | |||||
How to read a metric bolt size?
Determine the size of the metric bolt by looking at the first and third numbers. For example, if the metric bolt was M12x1.25×50
Then, the bolt thread is M12, and the length is 50mm.
M = This designates the fastener as a metric size.
12 = The nominal diameter in millimeters.
1.25 = The thread pitch, or distance between threads, in millimeters.
50 = The fastener’s length in millimetres.
Metric bolt properties grades
| Mechanical properties – Steel Screws and Bolts ISO 898-1 EN 20898-1 | |||||||||||
| Property class | 3.6 | 4.6 | 4.8 | 5.6 | 5.8 | 6.8 | 8.8 | 10.9 | 12.9 | ||
| <= 16mm | > 16mm | ||||||||||
| Tensile strength | nominal value | 300 | 400 | 400 | 500 | 500 | 600 | 800 | 800 | 1000 | 1200 |
| Rm in MPa (N/mm2) | minimum | 330 | 400 | 420 | 500 | 520 | 600 | 800 | 830 | 1040 | 1220 |
| Vickers hardness | minimum | 95 | 120 | 130 | 155 | 160 | 190 | 230 | 255 | 310 | 372 |
| HV=F 98N | maximum | 220 | 220 | 220 | 220 | 220 | 250 | 300 | 336 | 382 | 434 |
| Brinell hardness | minimum | 90 | 114 | 124 | 147 | 152 | 181 | 219 | 242 | 295 | 353 |
| HB F=30D2 | maximum | 209 | 238 | 285 | 319 | 363 | 412 | ||||
| Rockwell hardness HR | minimum HRB | 52 | 67 | 71 | 79 | 82 | 89 | ||||
| minimum HRC | 20 | 23 | 31 | 38 | |||||||
| maximum HRB | 95 | 95 | 95 | 95 | 95 | ||||||
| maximum HRC | 30 | 34 | 39 | 44 | |||||||
| Surface hardness | maximum | 320 | 356 | 402 | 454 | ||||||
| HV 0.3 | |||||||||||
| Yield stress | nominal value | 180 | 240 | 320 | 300 | 400 | 480 | ||||
| Rel in MPa(N/mm2) | minimum | 190 | 240 | 340 | 300 | 420 | 480 | ||||
| 0.2% elongation limit | nominal value | 640 | 640 | 900 | 1080 | ||||||
| Rp0.2 in Mpa (N/mm2) | minimum | 640 | 660 | 940 | 1100 | ||||||
| Test stress Sp | Sp/ReL or Rp0.2 | 0.94 | 0.94 | 0.91 | 0.94 | 0.91 | 0.91 | 0.91 | 0.91 | 0.88 | 0.88 |
| MPA (N/mm2) | 180 | 225 | 310 | 280 | 380 | 440 | 580 | 600 | 830 | 970 | |
| Elongation after fracture | minimum | 25 | 22 | 14 | 20 | 10 | 8 | 12 | 12 | 9 | 8 |
| A5 in % | |||||||||||
Metric bolt grade torque chart
| Breaking torque ISO 898-7 DIN 267 pt25 | ||||||||
| Thread | Pitch | Property class | ||||||
| 4.6 | 4.8 | 5.6 | 5.8 | 8.8 | 10.9 | 12.9 | ||
| Breaking torque (Nm) minimum | ||||||||
| M1 | 0.25 | 0.02 | 0.02 | 0.024 | 0.024 | 0.033 | 0.04 | 0.045 |
| M1.2 | 0.25 | 0.045 | 0.046 | 0.054 | 0.055 | 0.075 | 0.092 | 0.1 |
| M1.4 | 0.3 | 0.07 | 0.073 | 0.084 | 0.087 | 0.12 | 0.14 | 0.16 |
| M1.6 | 0.35 | 0.098 | 0.1 | 0.12 | 0.12 | 0.16 | 0.2 | 0.22 |
| M2 | 0.4 | 0.22 | 0.23 | 0.26 | 0.27 | 0.37 | 0.45 | 0.5 |
| M2.5 | 0.45 | 0.49 | 0.51 | 0.59 | 0.6 | 0.82 | 1 | 1.1 |
| M3 | 0.5 | 0.92 | 0.96 | 1.1 | 1.1 | 1.5 | 1.9 | 2.1 |
| M3.5 | 0.6 | 1.4 | 1.5 | 1.7 | 1.8 | 2.4 | 3 | 3.3 |
| M4 | 0.7 | 2.1 | 2.2 | 2.5 | 2.6 | 3.6 | 4.4 | 4.9 |
| M5 | 0.8 | 4.5 | 4.7 | 5.5 | 5.6 | 7.6 | 9.3 | 10 |
| M6 | 1 | 7.6 | 7.9 | 9.1 | 9.4 | 13 | 16 | 17 |
| M7 | 1 | 14 | 14 | 16 | 17 | 23 | 28 | 31 |
| M8 | 1.25 | 19 | 20 | 23 | 24 | 33 | 40 | 44 |
| M10 | 1.5 | 39 | 41 | 47 | 49 | 66 | 81 | 90 |
Metric bolt grades VS SAE grades, How to read metric bolt grades?
Many fasteners (screws, etc.), especially smaller sizes, are typically not graded—their strength isn’t specified. However, larger sizes and those for specialized purposes are made to meet certain strength requirements.
Inch fasteners commonly used in North America will have a grade or ASTM rating. Property Class (often just “class”) specifies metric fasteners. Special markings on screw heads and nuts identify the fastener’s grade. Replace a graded fastener with the same or higher grade (don’t replace a Grade 8 fastener with a Grade 5 or 2).
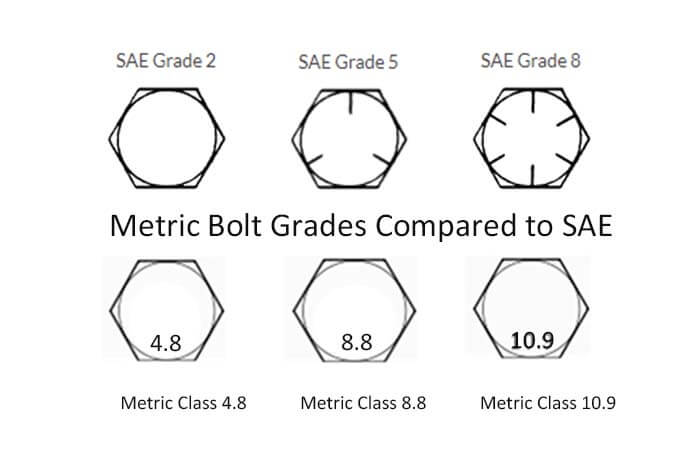
There are several grades of bolts, but the three common grades for SAE are 2, 5 and 8. The common class (grades) for metric are 4.8, 8.8, 10.9 and 12.9. Each grade has a specific bolt strength. No matter the system used to grade the bolts, the higher number means, the stronger the bolt.
Metric bolt grades compared to SAE grades
SAE Grade 2: Low strength.
SAE Grade 2H Nut’s Strength is similar to Grade 5. Use ASTM A325 structural bolts.
SAE Grade 5: Medium strength.
SAE Grade 8: High strength.
Metric Class 4.8: Similar to SAE Grade 2.
Metric Class 8.8: Similar to SAE Grade 5.
Metric Class 10.9: Similar to SAE Grade 8.
Metric Class 12.9: The highest metric for strength, it exceeds SAE Grade 8.
What is the specific difference between HRC and HB used in metric bolt grades?
What is HRC?
Rockwell hardness is an index to determine the hardness value by the depth of indentation plastic deformation, with 0.002 mm as a hardness unit.
What is HB?
Brinell hardness is a standard that indicates the hardness of a material. The Brinell hardness tester determines it. J.A. Brinell first proposed it in Sweden, hence the name Brinell hardness.
A hardened steel ball of diameter D is pressed into the surface of the measured metal with a load P of a certain size, and the load is removed after holding for some time. The ratio of load P to the indentation surface area F is the Brinell hardness value, recorded as HB.
The difference between HRC and HB
1. Hardness tester of the probe difference
Brinell hardness (HB) has a wide range of applications, and Rockwell hardness (HRC) applies to the surface of high-hardness materials, such as heat treatment hardness, etc. The difference between the two is that the hardness tester probe is different. The brinell hardness tester head is for steel balls, while the Rockwell hardness tester head is for diamonds.
2. Different soft and hard
Brinell hardness (HB) is generally used when the material is soft, such as non-ferrous metals, steel before or after heat treatment, or annealing. Rockwell hardness (HRC) is generally used for higher hardness materials, such as hardness after heat treatment.
3. Indentation distinction
Rockwell hardness (HRC) indentation is very small. The measured value has a localized, must-measure average of several points, suitable for finished products and sheets, classified as a class of nondestructive testing. Cloth-type hardness (HB) indentation is larger, the measured value is accurate, not applicable to finished products and sheets, and generally not classified as a class of nondestructive testing.
4. Display the degree difference
Rockwell hardness (HRC) directly on the dial display can also be a digital display, easy to operate, fast and intuitive, and suitable for mass production. Cloth-type hardness (HB) needs to use a microscope to measure the indentation diameter and then check the table or calculate. The operation is more cumbersome.
5. Unit difference
The hardness value of Rockwell hardness (HRC) is an unknown number with no unit; the hardness value of cloth hardness (HB) has a unit and has a certain approximate relationship with tensile strength.
Why do screws break?
- The reason why the screw will fracture, and its quality are directly related. Suppose the quality of the material is not qualified or in the process of processing. In that case, no suitable heat treatment, the product’s manufacturing process does not meet the standard, or the consumer in the selection of screws is not reasonable, and the use of the premises environment is relatively harsh, which will affect the service life of the screw.
- The problem of fracture of the screw is basically because the first has been loosened, and the latter will slowly fracture.
- Another point is that if it is used for screw fasteners that have loosened, this situation will lead to damage to the fasteners, and after the fasteners are damaged, it will further damage the equipment.
- The problem of damage to the screw and its fatigue strength is directly related to the experiment. If repeated vibration 1 million times without loosening, indicating that its quality is up to standard, the screw loosens and breaks; part of the reason is the fatigue strength of the bolt caused.
The above is a specific analysis of the strength level of the screw divided into which kinds and why the screw will appear loose. Most of them are caused by the strength of the screw is not standard enough or the loosening of the screw; if the phenomenon of fracture occurs, you can find the reason from these two aspects.
Besides the What Are Metric Bolt Grades article, you may also be interested in the below articles.
Plastic Injection Molding vs. 3D Printing What’s the Difference?
Extrusion vs. Injection Molding, What Is The Difference?
Injection Molding vs. Thermoforming, What’s the Difference?
Summary Of 50 Injection Mold Structure Operation Dynamic Diagrams
What Is The Difference Between Two-Platen Mold And Three-Platen Mold?
